Deploy to theDigitalOcean App Platform. Docker uses only local environment
This article explains how to deploy a web application using the DigitalOcean App Platform. For beginners in web development, one of the biggest hurdles to launching their own apps is deployment, and many struggle with this process even when following reliable tutorials.
I've been using DigitalOcean for 5–6 years. Initially, I used Droplets (VPS) for deployment. While Droplets are affordable, scalable, and flexible—making them ideal for individual developers—they aren't designed for simplified deployments. Configuring the web server and database from scratch can be quite tedious. I remember spending several days troubleshooting my first deployment with Droplets.
However, the release of DigitalOcean's App Platform in 2020 drastically simplified the deployment process. While the App Platform is slightly more expensive than Droplets, the ease of use more than justifies the cost.
This tutorial provides a stress-free and quick deployment method using the App Platform, ensuring that even those new to Django development can deploy their applications with ease. Although I use Docker in my development environment, deployment is even simpler without Docker, so we'll focus on that approach here.
Please note that this article contains affiliate links.
- Introducing the Repository I Created for this Deployment Tutorial
While deploying to the App Platform appears significantly easier than deploying to other cloud servers based on online tutorials, there are still a few potential stumbling blocks.
When you encounter these issues, and if your application is complex, it becomes difficult to determine whether the deployment failure stems from the application code itself or the deployment configuration.
To avoid this, it's best to use a simple application structure for experimental deployments.
For this reason, I've created a very basic application that only displays "Hello World." If you don't have a suitable app for testing deployments, clone this repository and try deploying it to your DigitalOcean App Platform account.
Important: This repository has two branches: master and develop. Make sure to clone the develop branch.
For example, use the following command to clone the repository:
git clone -b develop --single-branch https://github.com/DevWoody856/minimal_django_app.git
( Please write this command on a single line. )
The file structure of the repository is shown in the attached image. I'll explain the deployment process based on this structure.

2. Explaining the settings Directory within the Project
A crucial aspect of deploying Django applications to production is properly structuring your settings. While a single settings.py file is common during development, some settings within this file shouldn't be pushed to production, while others require environment-specific configurations.
Therefore, instead of a single settings.py, we create a settings directory, splitting the contents of settings.py into several files within this directory. Only the necessary files are then pushed to production.
Here's the structure of the settings folder:
settings/__init__.py: This file tells Python to treat the settings directory as a package. It also contains the logic to determine which settings file to load based on the current environment.
settings/base.py: This file houses common settings shared across all environments, such as INSTALLED_APPS, MIDDLEWARE, and TEMPLATES.
settings/dev.py: This file contains development-specific settings, like DEBUG = True, logging configurations, and any development tools or libraries.
settings/prod.py: This file holds production-specific settings, including database credentials, security configurations (e.g., ALLOWED_HOSTS), and optimization settings.
3. How to Write Each File for Production Deployment
3-1. __init__.py
The __init__.py file acts as the entry point for your settings. Here's an example of how to dynamically load the correct settings file based on the environment:
If the environment variable DJANGO_ENVIRONMENT is set to prod, the prod.py settings are loaded. Otherwise, dev.py is used.
You can set the DJANGO_ENVIRONMENT variable in the DigitalOcean App Platform control panel.
With this configuration, if DJANGO_ENVIRONMENT is prod, the production settings are imported on the App Platform. If it's any other value, the development settings are imported.
settings\__init__.py
import os
from pathlib import Path

if os.environ.get('DJANGO_ENVIRONMENT') == 'prod':
    from .prod import *
else:
    from .dev import *
3-2. prod.py
This is the production settings file. You will deploy this file to the DigitalOcean App Platform.
settings\prod.py
from .base import *
from urllib.parse import urlparse


DEBUG = False

BASE_DIR = Path(__file__).resolve().parent.parent.parent

ALLOWED_HOSTS = os.getenv("DJANGO_ALLOWED_HOSTS", "127.0.0.1,localhost").split(",")

DATABASE_URL = os.getenv('DATABASE_URL', None)

if not DATABASE_URL:
    DATABASES = {
        'default': {
            'ENGINE': 'django.db.backends.sqlite3',
            'NAME': BASE_DIR / 'db.sqlite3',
        }
    }
else:
    db_info = urlparse(DATABASE_URL)
    DATABASES = {
        'default': {
            'ENGINE': 'django.db.backends.postgresql_psycopg2',
            'NAME': 'db',
            'USER': db_info.username,
            'PASSWORD': db_info.password,
            'HOST': db_info.hostname,
            'PORT': db_info.port,
            'OPTIONS': {'sslmode': 'require'},
        }
    }
3-3. dev.py
This is the development settings file. This file should not be deployed to the DigitalOcean App Platform.
Therefore, you need to add its path to your .gitignore file.
After splitting the files as described above, let's review the other necessary files.
settings\dev.py
from .base import *
import environ

DEBUG = True
env = environ.Env()
BASE_DIR = Path(__file__).resolve().parent.parent.parent
environ.Env.read_env(os.path.join(BASE_DIR, '.env'))

ALLOWED_HOSTS = []

DATABASES = {
    'default': {
        'ENGINE': 'django.db.backends.postgresql_psycopg2',
        'NAME': os.getenv('DB_NAME'),
        'USER': os.getenv('DB_USER'),
        'PASSWORD': os.getenv('DB_PASSWORD'),
        'HOST': os.getenv('DB_HOST'),
        'PORT': os.getenv('DB_PORT'),
    }
}
4. Reviewing Other Necessary Files
The following files are required for deployment:
requirements.txt: This file lists the packages to be installed. We're installing Django, psycopg2-binary, django-environ, and gunicorn.
requirements.txt
Django==5.1.2
psycopg2-binary==2.9.10
django-environ==0.11.2
gunicorn==23.0.0
Procfile: This file declaratively specifies how to run the application.
While the App Platform might sometimes allow deployment without a Procfile, including it increases deployment reliability.
The contents of Procfile should be:
Procfile
web: gunicorn simple_app.wsgi
5. Files Needed Only for Development (Exclude from App Platform Deployment)
The following files are required only for development and should not be included in the App Platform deployment process:
docker-compose.yaml: The App Platform doesn't directly support docker-compose.yaml. Therefore, you don't need to include this file when deploying.
Dockerfile: While the App Platform does support deployments using a Dockerfile, doing so requires merging the configurations from your docker-compose.yaml into the Dockerfile. This adds extra configuration steps and complexity to the deployment process. For simplicity, I recommend avoiding Dockerfile deployments on the App Platform.
.env: You'll need to manually enter the contents of your .env file into the App Platform's environment variable settings. The .env file itself isn't used directly.
old_settings.py: My repository includes old_settings.py, which is the original, unsplit settings.py file. This file is not needed in the current configuration and should be excluded from deployment.
Configuring the .gitignore File
Make sure the four files mentioned above (docker-compose.yaml, Dockerfile, .env, and old_settings.py) are listed in your .gitignore file. Including these files can negatively impact your deployment. Carefully configuring your .gitignore is crucial to prevent unnecessary files from being accidentally included in the App Platform deployment process.
I've created a .gitignore file that you can use as a reference.
6. Pushing to Your GitHub Repository
After configuring these files, push them to your GitHub repository. I'll omit the details of pushing to GitHub, as numerous tutorials are readily available online.
7. Setting up the DigitalOcean App Platform
Once you've prepared your project for deployment, create a DigitalOcean account and deploy it to the App Platform.
While the standard App Platform deployment process is documented elsewhere, including other blogs and the official documentation, I'll explain the steps tailored to our current setup.
You can access the DigitalOcean App Platform here. And, good news! They're currently offering $200 in free credits.
Deploying your application involves four main steps:
7-1. Creating a DigitalOcean account and connecting your GitHub account 7-2. Configuring the database 7-3. Entering environment variables 7-4. Deploying the application
Let's break down these steps with screenshots.
7-1. Creating a DigitalOcean Account and Connecting Your GitHub Account
Creating a DigitalOcean account is straightforward, so I'll omit those details. Here's what to do after you've created your account and navigated to the main dashboard:
7-1-1. Connecting Your GitHub Account
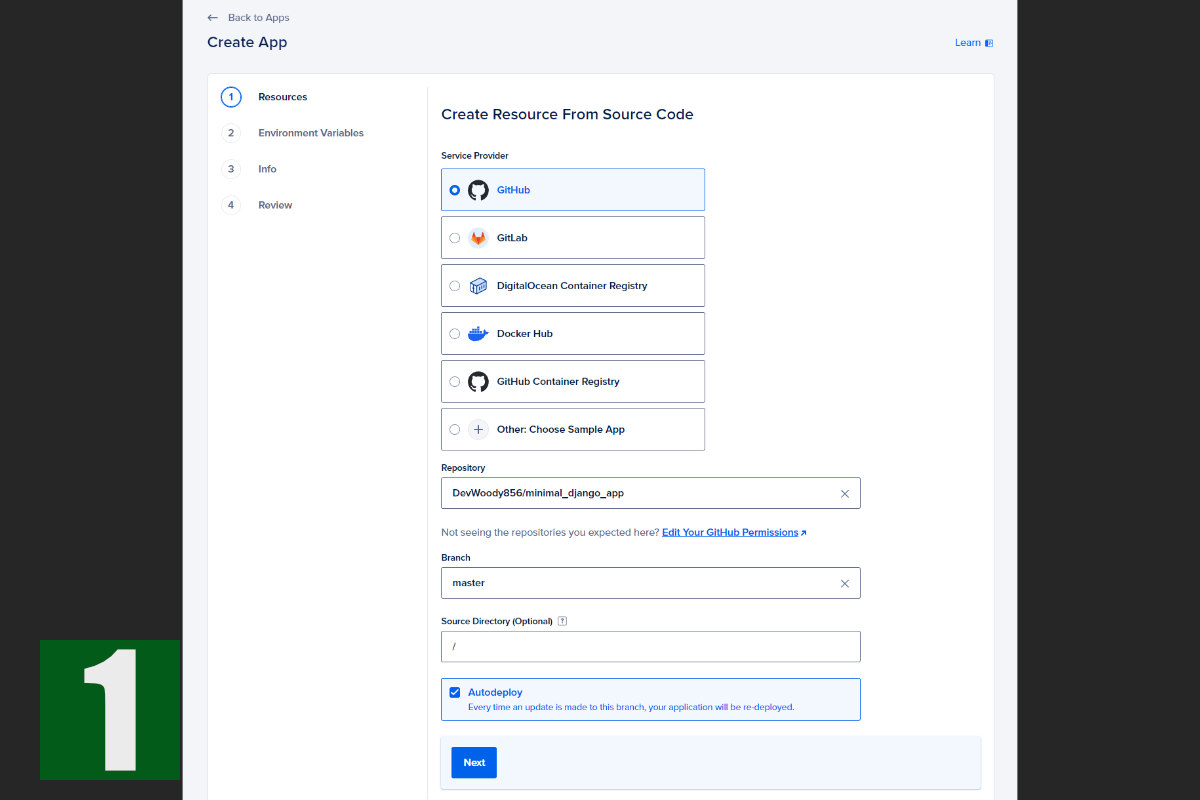
On the DigitalOcean dashboard, you'll see a green "Create" button in the header. Click it, and select "App Platform" from the menu.
You'll then see a screen similar to Image 1. Select "GitHub." If this is your first time, you'll need to grant DigitalOcean the necessary permissions on GitHub. Follow the on-screen instructions.
Once connected, you'll be able to select the repository you pushed your app to.
After selecting the repository, choose the branch you want to deploy.
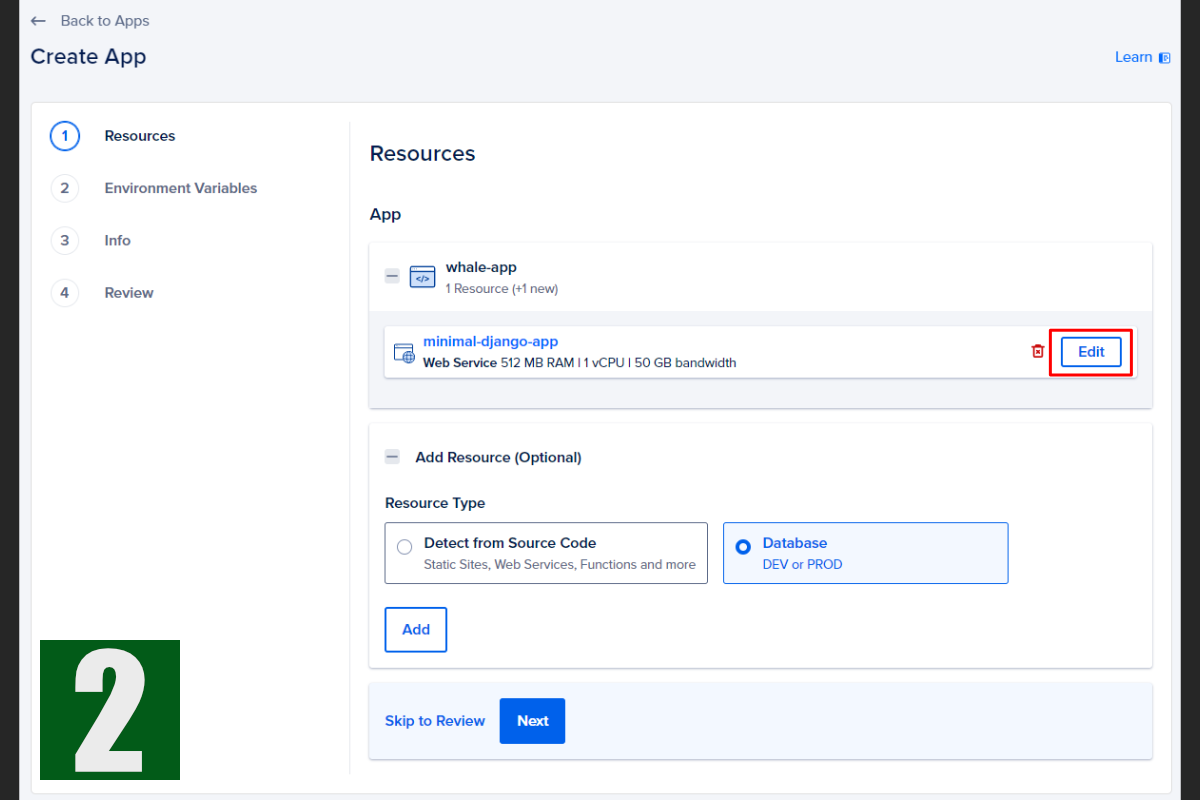
7-1-2. Selecting a Web Server
Next, you'll choose your resources. This involves configuring the web server for your application and potentially a worker if you're using Celery.
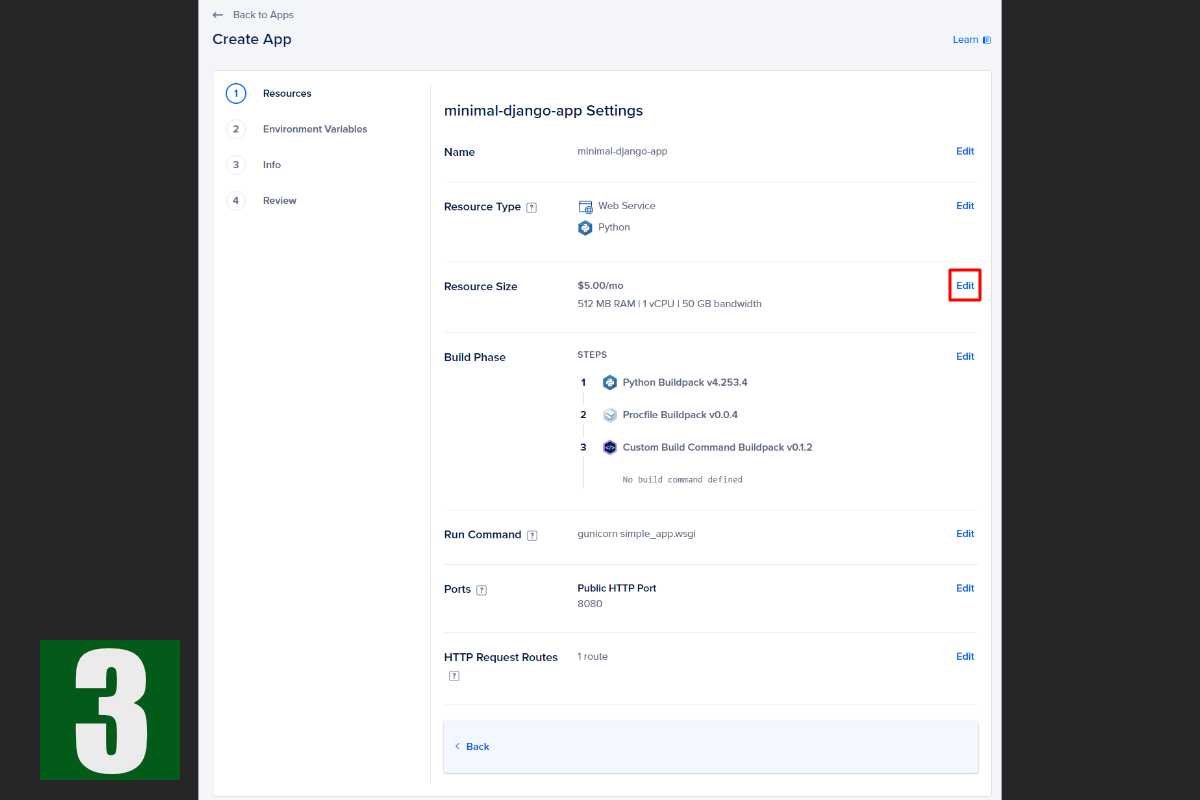
You should see a screen like Image 2. Click "Edit." Image 3 should appear.
The "Resource Type" should already be set to "Web Service," which is correct.
The important setting here is "Resource Size." The cheapest option is $5/month.
Select this option. (The prices displayed are monthly. If you destroy the app immediately after successful deployment, you likely won't be charged. Plus, remember the $200 free credit if you use my link!)

7-2. Configuring the Database
After connecting to GitHub and configuring the web server, it's time to set up the database.
As shown in Image 5, you can select a database from the "Add Resource" section.
Select "Database" and click "Add." You'll be taken to a screen like Image 6.

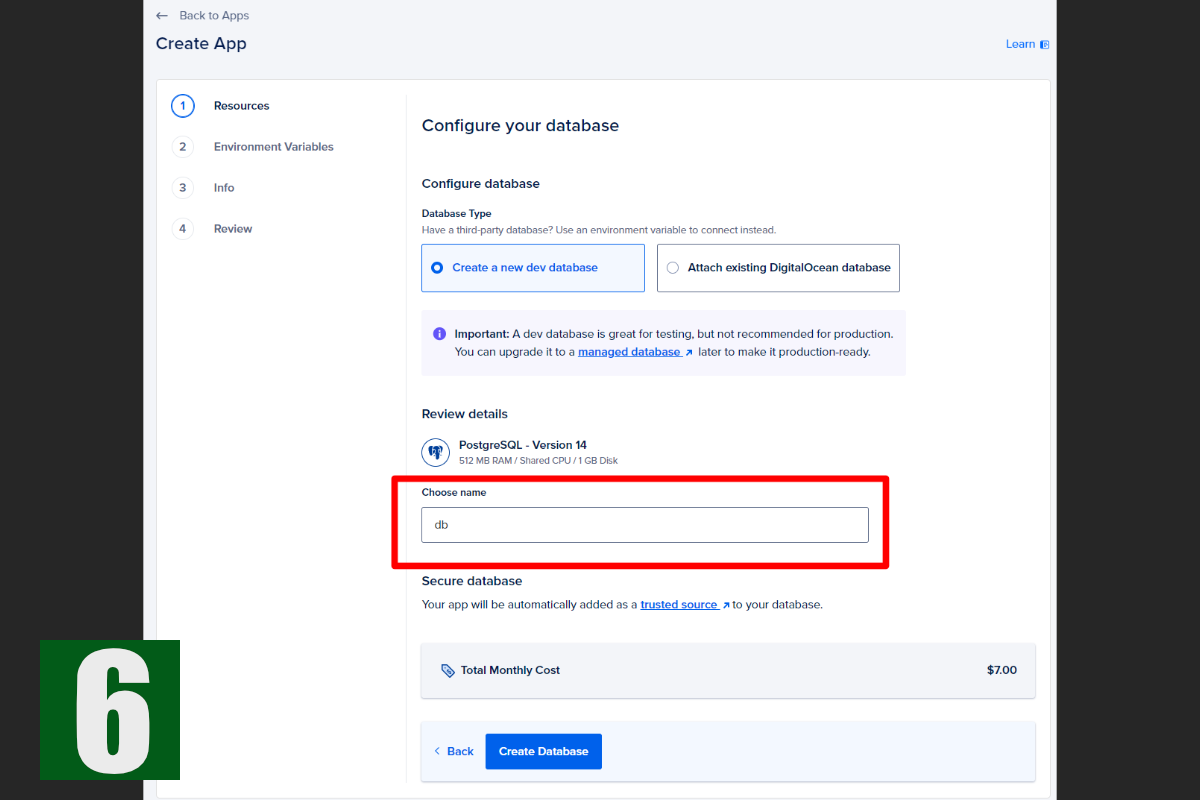
Pay attention to the database name. For security reasons, you should change this name. However, if you do, you'll also need to modify the following section in your application:
Failure to update this section will result in deployment errors.
Finally, you'll see the database cost. A development database is $7/month, but you likely won't be charged much if you destroy the app shortly after deployment.
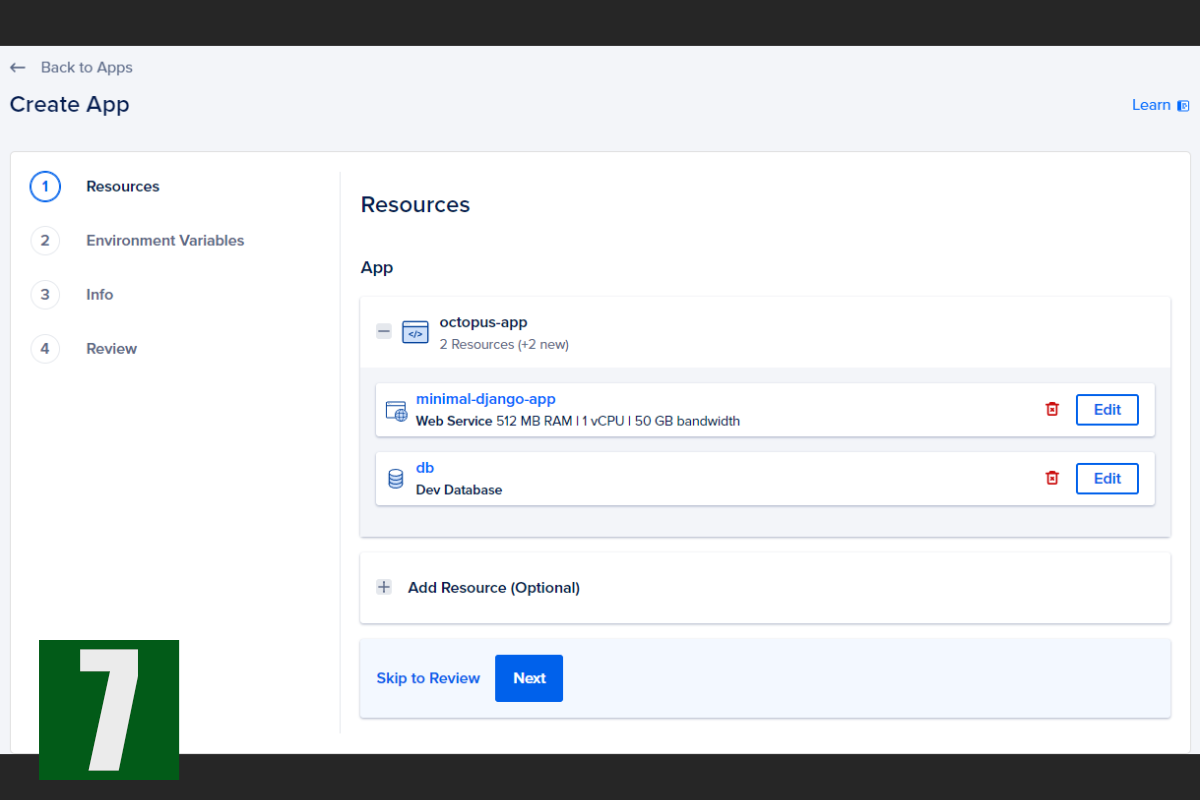
After configuring the database, you'll see a screen similar to Image 7.
settings\prod.py
    db_info = urlparse(DATABASE_URL)
    DATABASES = {
        'default': {
            'ENGINE': 'django.db.backends.postgresql_psycopg2',
            'NAME': 'db',
            'USER': db_info.username,
            'PASSWORD': db_info.password,
            'HOST': db_info.hostname,
            'PORT': db_info.port,
            'OPTIONS': {'sslmode': 'require'},
        }
    }
7-3. Entering Environment Variables
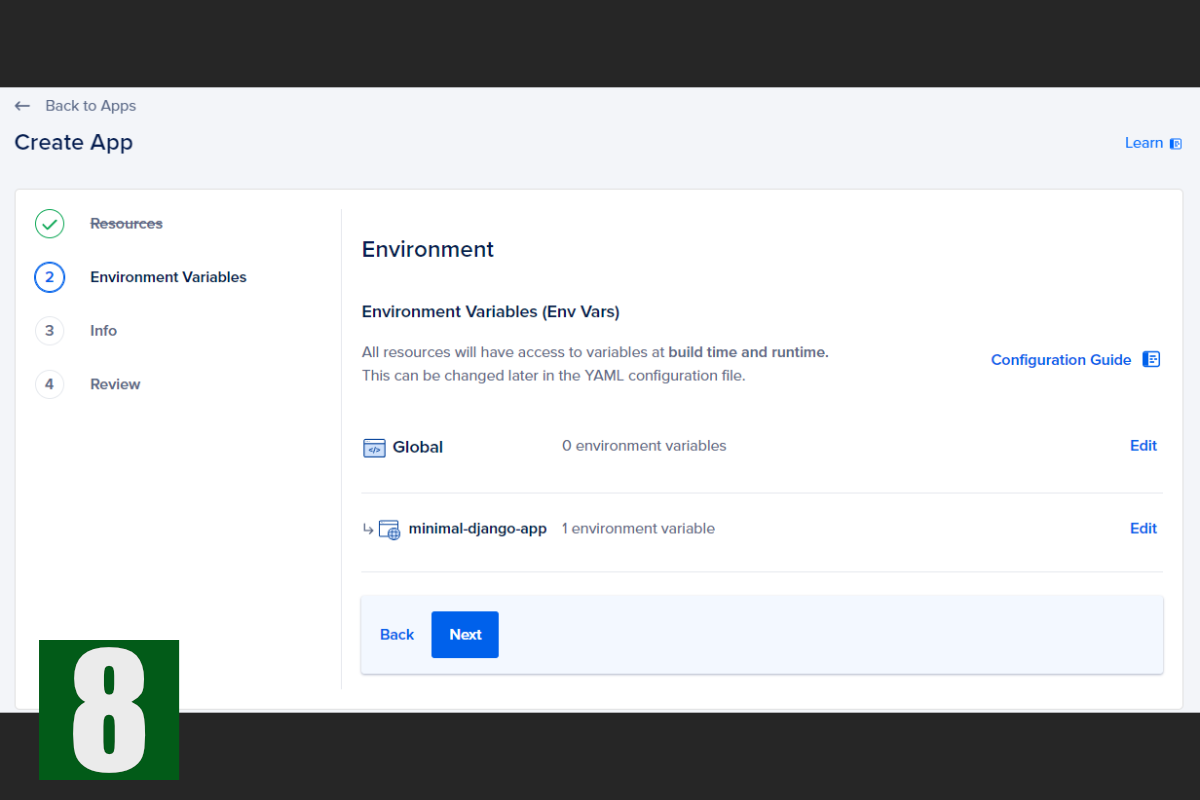
Next, enter your environment variables. Click "Next" on Image 7 to proceed to Image 8, where you'll input these variables.
You can set environment variables globally or per app. Due to security concerns with global environment variables, we'll set all variables at the app level.
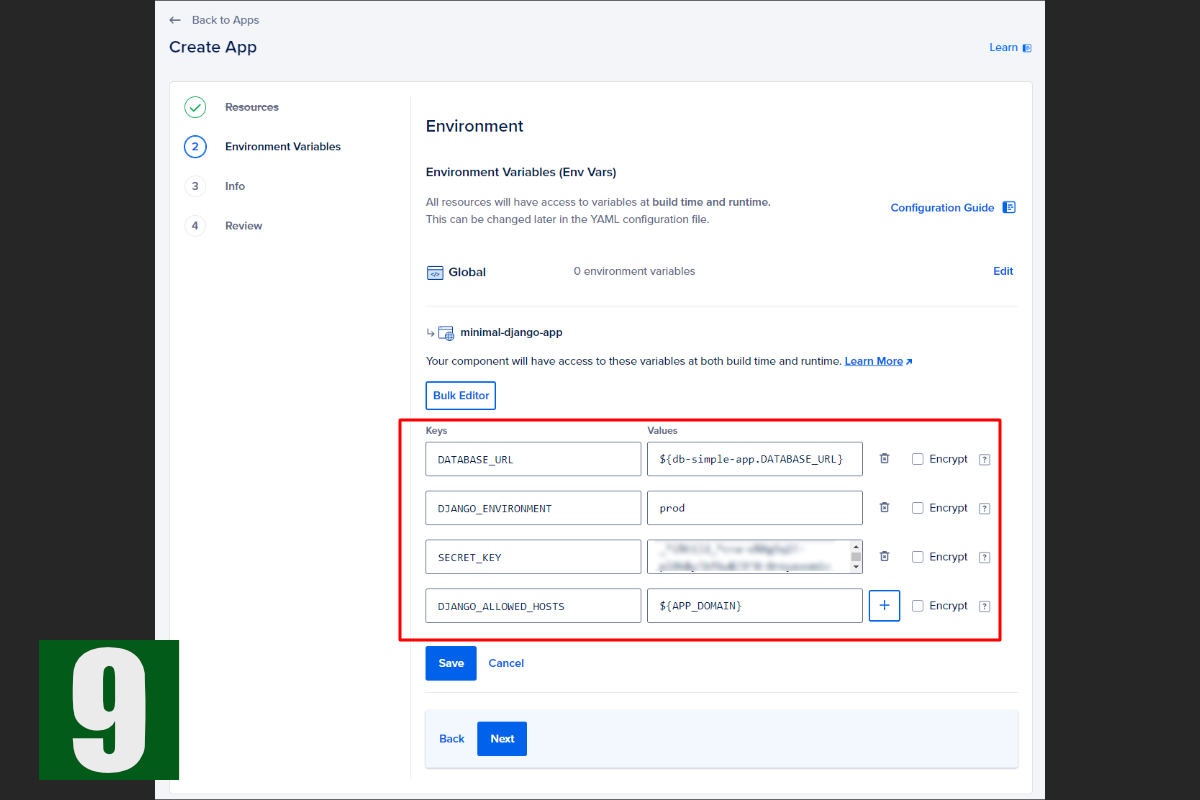
Click "Edit" for your app to access the environment variable input screen shown in Image 9.
If you've already configured the database, the DATABASE_URL value will be pre-filled.
Because DATABASE_URL includes the USER, PASSWORD, HOST, and PORT values from your Django prod.py file, you don't need to set those individually as environment variables.
Besides DATABASE_URL, here are the other variables you need to set for this deployment:
a. DJANGO_ENVIRONMENT: This variable, used in the __init__.py file within your settings folder, determines which settings file is loaded. Set it to prod for production environments.
b. SECRET_KEY: Enter your Django secret key.
c. DJANGO_ALLOWED_HOSTS: Enter ${APP_DOMAIN} here. This will automatically populate with the domain assigned by DigitalOcean. Even if you plan to use a custom domain, use ${APP_DOMAIN} here. (Custom domain setup is beyond the scope of this tutorial, but there's a dedicated section for it in the App Platform settings. Setting DJANGO_ALLOWED_HOSTS to ${APP_DOMAIN} will automatically configure your custom domain once you add it.)
This article provides further information on this environment variable.
7-4. Deploying the Application
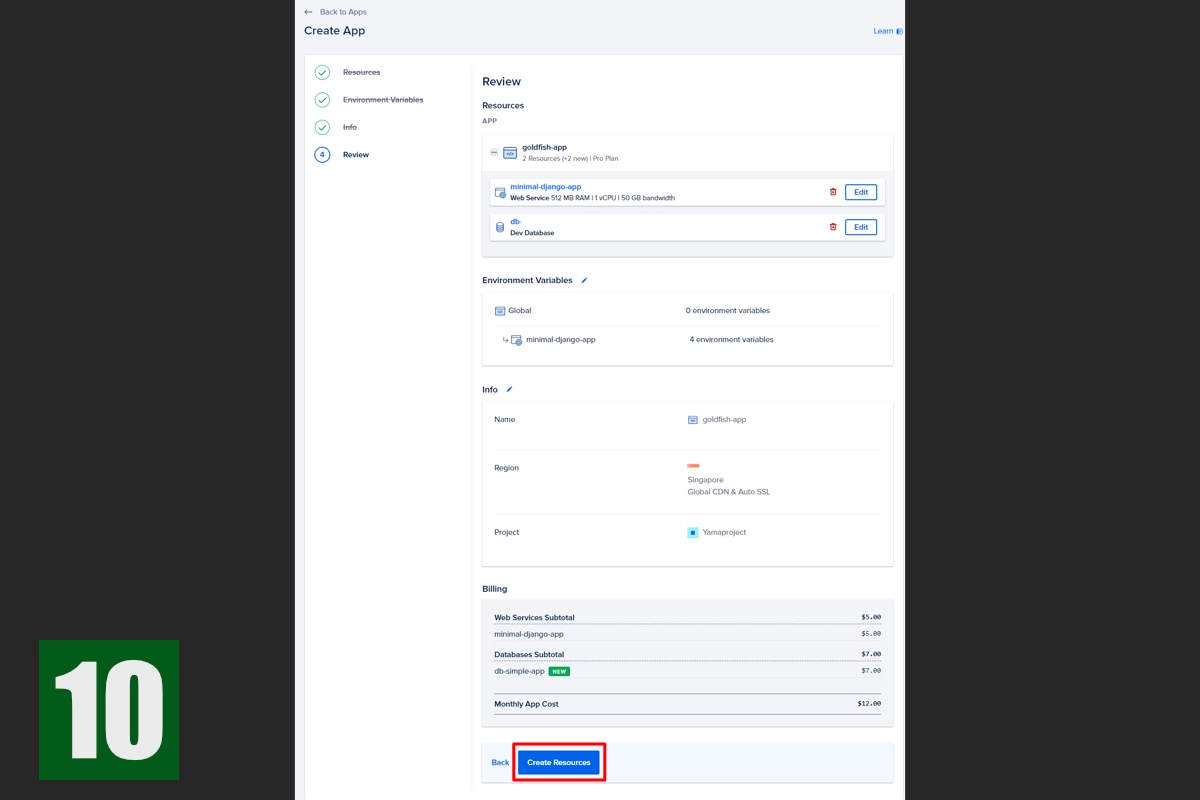
After completing steps 1-3, you'll see Image 10, which is a confirmation screen. Click "Next."
You'll then see Image 11, summarizing the final configuration and cost. With our minimal configuration, the monthly cost is $12.
However, combining the free $200 credit with destroying the app shortly after deployment should result in no charges.
Click "Create Resources" to begin deployment.
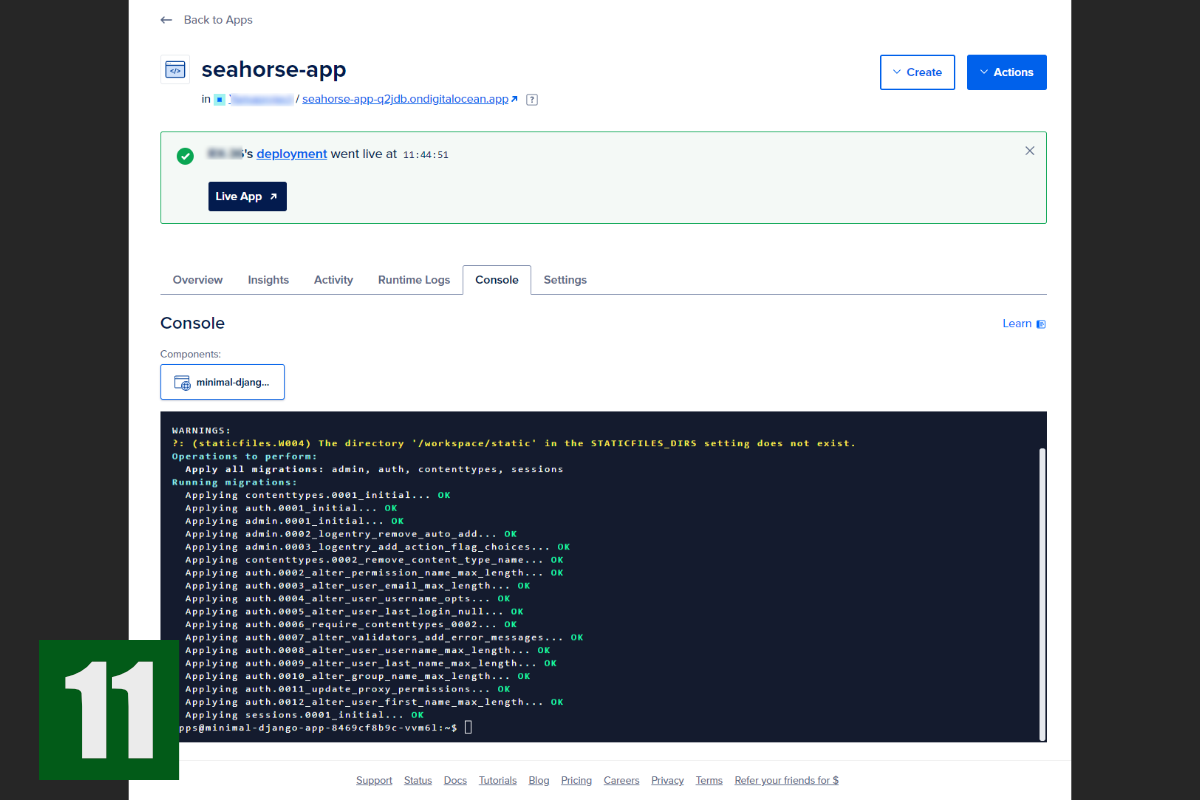
The deployment process will take a few tens of seconds. Upon successful deployment, you'll see a green success message, as shown in the screenshot.
Next, select the "Console" tab and run the migrate and createsuperuser commands to initialize your app.
This concludes the tutorial.
Deploying to the App Platform is quite easy, but there are a few key points to remember. Based on my experience with the App Platform, here are some tips for smooth deployments:
1. Include Gunicorn in requirements.txt: While Django's development server is sufficient during development, you need a WSGI server like Gunicorn in production to interface between the web server and your Python application. Without it, deployment will fail.
2. Create a Procfile: Without a Procfile, the App Platform might not know where to start your application, leading to errors. Creating a Procfile prevents this.
PaaS (Platform as a Service) has significantly simplified application deployments. I believe DigitalOcean, in particular, offers one of the easiest and most affordable deployment solutions. Leverage these services to launch your own projects with confidence!