This article explains how to create a smooth scrolling function. Smooth scrolling allows a user to click a link that targets a different section within the same page, causing the browser to smoothly animate the scroll to that target destination.
While scrolling functionality seems trivial because it's so ubiquitous on the web, it can be surprisingly challenging for beginners to implement. This article will guide you through the implementation process.
Development Environment
BACKEND: Django
FRONTEND: Django templates and jQuery
Utilized Django and JS Packages
We'll only be using jQuery for this implementation; no special Django packages are required.
While numerous Vanilla JS and jQuery-based Table of Contents modules exist online, I found that some were more complicated to set up than expected, and others didn't work well within this site's environment. Therefore, I decided it would be faster to create a custom Table of contents.
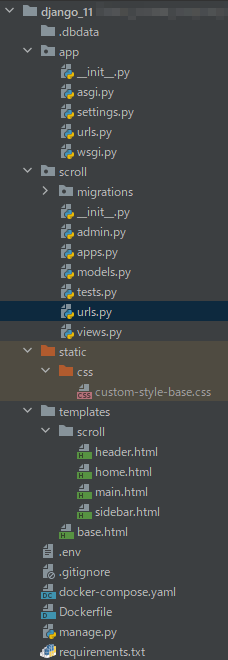
Project structure
Project File Structure is as follows.
The project name is app and the application name is scroll. Since I use Docker for most of my development, the following file structure includes Docker-related files and a .dbdata folder.
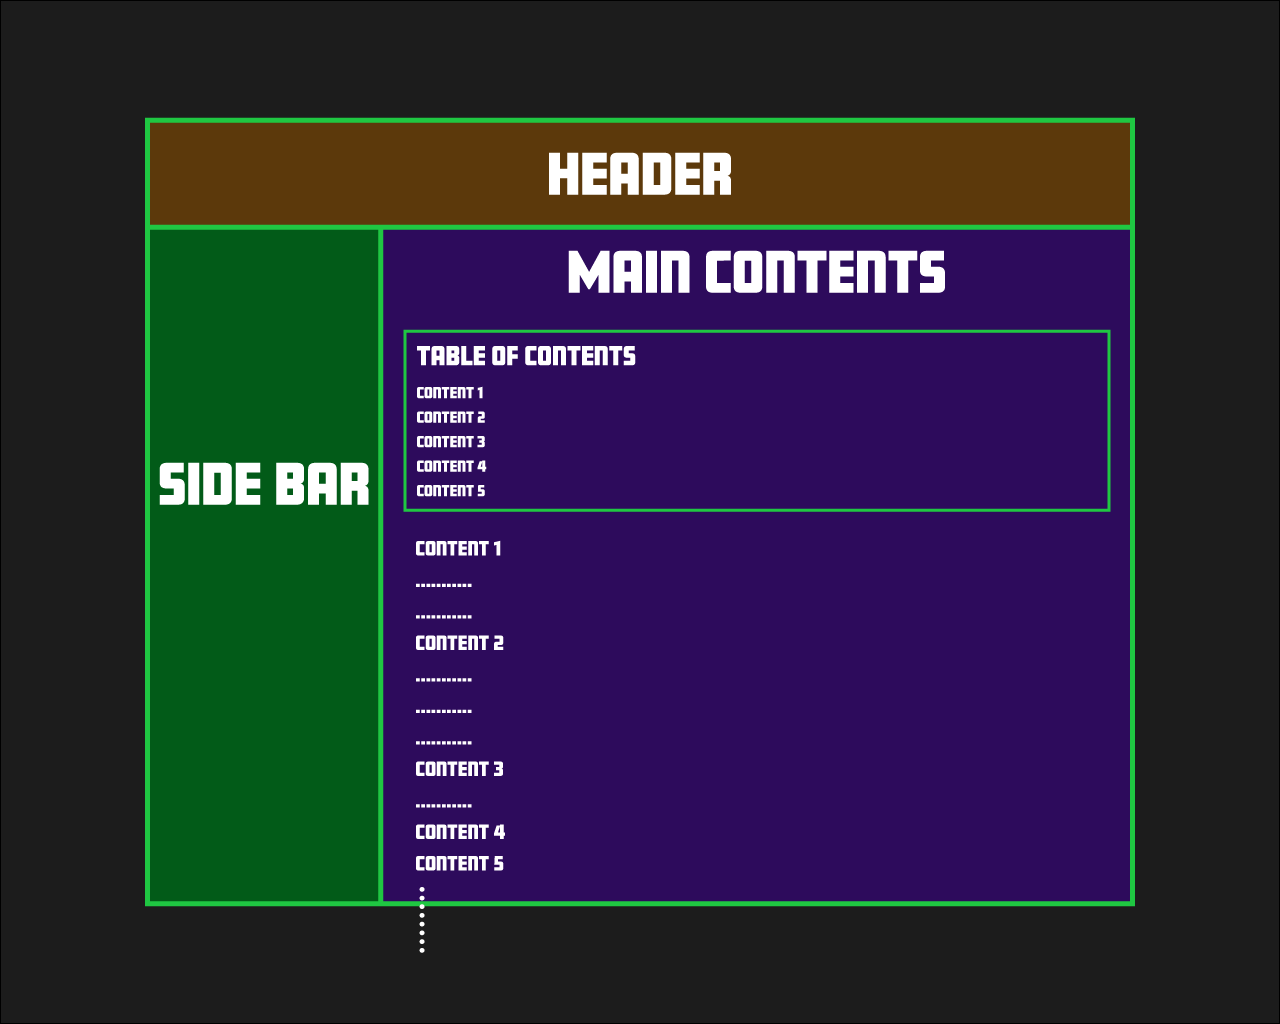
Page design
In this post, we'll be creating a page with the following design:
Clicking on a chapter title in the Table of Contents will smoothly scroll the page to the corresponding content section.
Development Process
1. Basic Django setup
This srticle assumes that you already have a basic setup of Django. If you need a basic setup of Django using Docker, click here.
2. Writing the codes
Let's create a basic website by following these steps:
a. Configure the necessary settings in the settings.py file within the project folder. b. Create a urls.py file in the project folder. c. Create a urls.py file in the application folder. d. Create the views.py file. e. Create the website template. f. Create the CSS for the template.
a. settings.py
...

TEMPLATES = [
    {
        'BACKEND': 'django.template.backends.django.DjangoTemplates',
        'DIRS': [BASE_DIR / 'templates'],
        'APP_DIRS': True,
        'OPTIONS': {
            'context_processors': [
                'django.template.context_processors.debug',
                'django.template.context_processors.request',
                'django.contrib.auth.context_processors.auth',
                'django.contrib.messages.context_processors.messages',
            ],
        },
    },
]

STATIC_URL = '/static/'

STATICFILES_DIRS = [
    os.path.join(BASE_DIR, "static"),
]

...
b. urls.py in project
from django.contrib import admin
from django.urls import path,include

urlpatterns = [
    path('admin/', admin.site.urls),
    path('', include('scroll.urls', namespace='scroll')),
]
c. urls.py in app
from django.urls import path, include
from scroll import views

app_name = 'scroll'

urlpatterns = [
    path('', views.HomeView.as_view(), name='home'),
]
d. views.py
from django.views.generic import TemplateView

class HomeView(TemplateView):
    template_name = "scroll/home.html"
e. Templatebase.html
{% load static %}
<!doctype html>
<html lang="en">
    <head>
        <meta charset="UTF-8">
        <meta name="viewport"
              content="width=device-width, user-scalable=no, initial-scale=1.0, maximum-scale=1.0, minimum-scale=1.0">
        <meta http-equiv="X-UA-Compatible" content="ie=edge">
        <link rel="stylesheet" href="{% static 'css/custom-style-base.css' %}">
        <title>Document</title>
    </head>
    <body>
        <section class="container">

            {% block content %}
            {% endblock %}

        </section>
        <script src="https://code.jquery.com/jquery-3.6.0.min.js" integrity="sha256-/xUj+3OJU5yExlq6GSYGSHk7tPXikynS7ogEvDej/m4=" crossorigin="anonymous"></script>
    </body>
</html>
home.html
{% extends "base.html" %}

{% block content %}

        {% include "scroll/header.html" %}

        {% include "scroll/sidebar.html" %}

        {% include "scroll/main.html" %}

{% endblock %}
header.html
<header class="header">
    <section>Header</section>
</header>
main.html
<section class="main">
    <div class="main__text">
        <div class="content">
        </div>
    </div>
</section>
f. CSS custom-style-base.css
*{
    padding:0;
    margin:0;
    box-sizing:border-box;
}

.grid{
    position: relative;
    width: 100vw;
    min-height: 100vh;
    overflow: auto;

    display: grid;
    grid-template-columns: auto 1fr;
    grid-template-rows:  auto 1fr;
    grid-template-areas:
      'header header'
      'sidenav main'
}

.header {
    grid-area: header;
    position: fixed;
    top: 0;
    width: 100%;
    height: 5rem;
    z-index: 100;
    background-color:#5C390B;
}

.sidenav{
    grid-area: sidenav;
    position: fixed;
    top: 5rem;
    left:0;
    width: 20rem;
    height: calc(100% - 5rem);
    background-color:#025B18;
}

.main{
    grid-area: main;
    position: absolute;
    top: 5rem;
    left: 20rem;
    right: 0;
    width: calc(100% - 20rem);
    height: auto;
    transition: all 0.3s;
    background-color: #e4d1ff;
}

.content{
   margin: 3rem 0;
}

.content_text{
    margin-bottom: 3rem;
    font-size: 2rem;
}
3. Create dummy content in .container
To validate the Scroll function, create dummy content. The structure of this dummy content should follow these guidelines:
- Ensure that the
H2andptags are paired. - Make sure that the
ptag contains enough text to ensure that the title of theH2is spaced well enough.
You can conveniently copy dummy content from this website to use for testing the scroll function.
main.html
<section class="main">
    <div class="main__text">
        <div class="content">
             <h2 id="chapter1" class="js-toc-content">list 1</h2>
                <p class="content_text">Lorem Ipsum is ...</p>
            <h2 id="chapter2" class="js-toc-content">list 2</h2>
                <p class="content_text">Lorem Ipsum is ...</p>
            <h2 id="chapter3" class="js-toc-content">list 3</h2>
                <p class="content_text">Lorem Ipsum is ...</p>
            <h2 id="chapter4" class="js-toc-content">list 4</h2>
                <p class="content_text">Lorem Ipsum is ...</p>
            <h2 id="chapter5" class="js-toc-content">list 5</h2>
                <p class="content_text">Lorem Ipsum is ...</p>
            <h2 id="chapter6" class="js-toc-content">list 6</h2>
                <p class="content_text">Lorem Ipsum is ...</p>
        </div>
    </div>
</section>
4. Create a Table Of Contents
Insert a Table of Contents at the top of the content you created in step 3.
If there are only about 10 items, it should not take much time to create them manually.
In this case, we are assuming about ten of TOPICs.
The structure of the Table of Contents is represented by the accompanying code.
main.html
<section class="main">
    <div class="main__text">
        <div class="toc">
            <p>Table of content</p>
            <h2 class="js-toc"><a class="toc_click" href="#chapter1">list 1</a></h2>
            <h2 class="js-toc"><a class="toc_click" href="#chapter2">list 2</a></h2>
            <h2 class="js-toc"><a class="toc_click" href="#chapter3">list 3</a></h2>
            <h2 class="js-toc"><a class="toc_click" href="#chapter4">list 4</a></h2>
            <h2 class="js-toc"><a class="toc_click" href="#chapter5">list 5</a></h2>
            <h2 class="js-toc"><a class="toc_click" href="#chapter6">list 6</a></h2>
        </div>
        <div class="content">
             <h2 id="chapter1" class="js-toc-content">list 1</h2>
                <p class="content_text">Lorem Ipsum is ...</p>
            <h2 id="chapter2" class="js-toc-content">list 2</h2>
                <p class="content_text">Lorem Ipsum is ...</p>
            <h2 id="chapter3" class="js-toc-content">list 3</h2>
                <p class="content_text">Lorem Ipsum is ...</p>
            <h2 id="chapter4" class="js-toc-content">list 4</h2>
                <p class="content_text">Lorem Ipsum is ...</p>
            <h2 id="chapter5" class="js-toc-content">list 5</h2>
                <p class="content_text">Lorem Ipsum is ...</p>
            <h2 id="chapter6" class="js-toc-content">list 6</h2>
                <p class="content_text">Lorem Ipsum is ...</p>
        </div>
    </div>
</section>
5. Implementing the Scroll Function
Now that we have prepared the necessary code, it's time to implement a function that scrolls to the desired topic when a Table of Contents item is clicked.
Add the following code under the base.html you wrote former.
base.html
{% load static %}
<!doctype html>
<html lang="en">
    ...
</html>

<script>
    $(function(){
        $(".toc_click").click(function() {

            const adjust = 0;
            const speed = 400;

            const href= $(this).attr("href");
            const href_id = href.replace("#", "")
            const element = document.getElementById(href_id);

            const position = element.offsetTop + adjust;
            $(".container").animate({scrollTop : position}, speed, "swing");

             return false;

         });
     });
</script>
Key points of this JS code
This JavaScript code first gets the href attribute (ID of the link destination) that the user clicked on. It then measures the distance between the top of the main part and the link destination, and scrolls the measured distance using the Animate method.
There are two key points to note:
- 1. When scrolling, it is necessary to obtain the distance from the top of the element to be scrolled to the link destination. In this case, the element to be scrolled is `.container`, not the window or body tag.
- 2. The Animate method starts from `.container`, not HTML or body.
Since the header is fixed to the top of the window, measuring the scroll distance from the window or body will not scroll correctly. Therefore, the distance is measured from the container class.
The following code is especially important:
$(".container").animate({scrollTop : position}, speed, "swing");
Here is an explanation of this code:
- $(".container"): Uses the jQuery selector to select elements with class `.container`.
- animate(): A jQuery method that applies an animation effect to the selected element.
- {scrollTop : position}: Specifies the CSS property to animate and the final value. This example modifies the scroll position (`scrollTop`) and moves it to the value specified by the variable called `position`.
- speed: Specifies the animation speed in milliseconds. For example, 1000 will complete the animation in 1 second.
- "swing": Specifies the animation easing type. `"swing"` is jQuery's default easing type, which accelerates and decelerates at the beginning and end of the animation. Another option is `"linear"`, which means the animation progresses at a constant speed.
All of this code will move the scroll position of the .container element to position with an animation effect, the speed of the animation will be specified by speed, and the easing type will be "swing".
Now, it's done!
If you're struggling with creating a table of contents in your blog, this article may provide some helpful guidance. Feel free to use it as a reference!