Hello. Django developers have probably used a package called “Allauth” at least once. Allauth is the most well-known authentication system among Django's third-party packages. When building an application with Django, many developers might first consider using django-allauth for authentication.
django-allauth is very useful because it simplifies the process of creating an authentication system. However, there is little information available online about how to create an authentication system with multiple user types and registration/login forms using Allauth. Furthermore, add to this multiple user-type logins, plus social account authentication(such as google login), and this practice becomes even more difficult to find on the Internet.
In this article, I will describe how to create an authentication system using Allauth that integrates multiple user types, multiple login screens, and authentication with Google login. Although there are still some issues to be solved, I believe I have succeeded in creating a working solution.
This article is quite lengthy! Here is the sequence of steps involved in this process:
1. Application specification
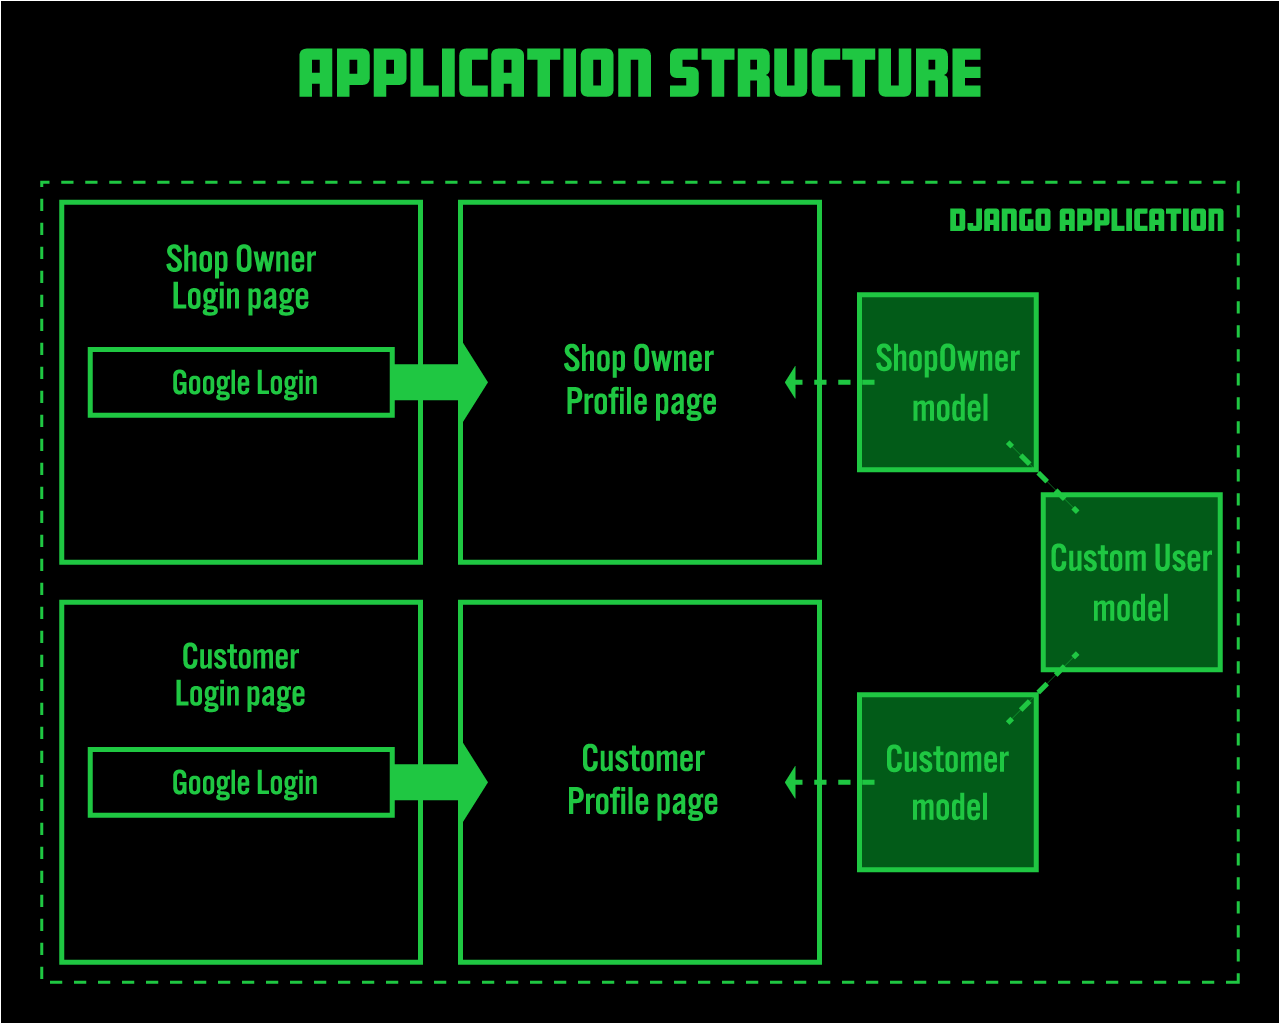
The attached diagram simplifies the application's structure.
Let's start with a brief overview of the app's specifications:
- There are two login pages. This application simulates an e-commerce site, with one login page for Shop users and another for end-users (Customers).
- Both login pages only implement Google login. There is no email address authentication.
- Whether a user is registering for the first time or an existing user is logging in, the authentication process uses the same Google login button.
- Users authenticated through the Shop user login page are not permitted to authenticate through the end-user login page, and vice versa.
The left side of the attached diagram represents the front-end, and the right side represents the back-end. The front-end has two login pages. When a new user clicks the Google login button, they are presented with a confirmation screen since it's their first login. After authentication, the user is redirected to their profile page.
Internally, this application uses three models to manage users: CustomUser, Shop, and Customer.
Users authenticated via the Shop user login page have their data stored in the CustomUser model and also in the Shop model. Similarly, users authenticated via the end-user login page have their data stored in the CustomUser model and also in the Customer model.
2. Django Basic Setup
As a first step in the process of this article, please set up a Django project, create an empty application, and get to the point where the any text like "Hello world!" on the template.
There are many tutorials on other tech blogs that cover Django basic setup. Please refer to those tutorials.
In my case, I use Docker for Django setup. If you want to use Docker for setup, see this article for information on how to set up Django with Docker.
This time, the project name is twologin and the application name is two_app.

Django packages
requirements.txt file for this application is as follows.
Django==4.0.4
psycopg2-binary==2.9.3
django-environ==0.8.1
django-allauth==0.44.0
3. django-allauth setup
Next, Let's install django-allauth(referred to below as allauth). If you have followed the basic setup in this article, add allauth to requirements.txt and docker-compose up --build again.
Once you made sure the INSTALL was ready, make the following settings in settings.py.
twologin/settings.py
...

INSTALLED_APPS = [
    ...
    'django.contrib.sites',
    'allauth',
    'allauth.account',
    'allauth.socialaccount',
    'allauth.socialaccount.providers.google'
]

# allauth
SITE_ID = 1
SOCIALACCOUNT_EMAIL_VERIFICATION = "mandatory"
SOCIALACCOUNT_EMAIL_REQUIRED = True
SOCIALACCOUNT_AUTO_SIGNUP = False
ACCOUNT_USERNAME_REQUIRED = False
SOCIALACCOUNT_QUERY_EMAIL = True
ACCOUNT_SESSION_REMEMBER = False

SOCIALACCOUNT_PROVIDERS = {
    "google": {
        "SCOPE": [
            "profile",
            "email",
        ],
        "AUTH_PARAMS": {
            "access_type": "online",
        }
    }
}

MIDDLEWARE = [
...
]
...

TEMPLATES = [
    {
        'BACKEND': 'django.template.backends.django.DjangoTemplates',
        'DIRS': [
            os.path.join(BASE_DIR / 'templates'),
            os.path.join(BASE_DIR, 'templates', 'allauth'), #here
        ],
        ...
        },
    },
]
4. Creating Three Types of Models
This chapter is the critical point in this application. As mentioned at the beginning of this article, we will create three models in this app.
The comprehensive user management is performed by the CustomUser model. Immediately after the user clicks the login button, an attribute named usertype will be given, with a value of either is_shop or is_customer. Users with the parameter is_shop are assigned to the Shop model. Users with is_customer (to be assigned later) are assigned to the Customer model.
First, let's create a CustomUser Model.
The CustomUser model is based on the AbstractBaseUser class. Unlike AbstractUser, AbstractBaseUser does not inherit all of the User's fields. Therefore, the fields in the CustomUser model are UserID (primary key), username, email, and created. Additionally, the boolean fields is_shop, is_customer, is_staff, is_active, and is_superuser must be explicitly set (otherwise, an error occurs when creating a superuser).
Furthermore, we must add the has_module_perms and has_perm methods. Failing to do so will result in no data being displayed in the Django admin panel.
two_app/models.py
from uuid import uuid4
from django.db import models
from django.utils import timezone
from django.contrib.auth.base_user import AbstractBaseUser

class CustomUser(AbstractBaseUser):
    userId = models.CharField(
        max_length=255, default=uuid4, primary_key=True, editable=False, unique=True)
    username = models.CharField(max_length=255, unique=True)
    email = models.EmailField(unique=True)
    created = models.DateTimeField(default=timezone.now)

    is_shop = models.BooleanField(default=False)
    is_customer = models.BooleanField(default=False)

    is_staff = models.BooleanField(default=False)
    is_active = models.BooleanField(default=True)
    is_superuser = models.BooleanField(default=False)

    objects = UserManager()

    USERNAME_FIELD = 'username'
    REQUIRED_FIELDS = ['email']

    def __str__(self):
        return self.email

    def has_module_perms(self, app_label):
        return self.is_superuser

    def has_perm(self, perm, obj=None):
        return self.is_superuser
5. Creating a User Manager
To properly use the CustomUser model, we need to create a UserManager, especially when creating a superuser. Please add the accompanying code to models.py.
two_app/models.py
...
from django.contrib.auth.base_user import BaseUserManager

class UserManager(BaseUserManager):
    def create_user(self, username, email, password=None):
        if not email:
            raise ValueError('mail address is required')

        email = self.normalize_email(email)
        user = self.model(username=username, email=email)

        user.set_password(password)
        user.save(using = self._db)

        return user

    def create_superuser(self, username, email, password):

        user = self.create_user(username, email, password)
        user.is_staff = True
        user.is_superuser = True
        user.save(using=self._db)

        return user

class CustomUser(AbstractBaseUser):

    ...
I wrote the create_user and create_superuser methods. (Perhaps this is not the best way to write the UserManager. If you know a better way, please message me.)
Next, create a Shop model and a Customer model. For each, add a one-to-one field to the customUser model.
models.py
...

class UserManager(BaseUserManager):
    ...

class CustomUser(AbstractBaseUser):
    ...

class Shop(models.Model):
    user = models.OneToOneField(CustomUser, on_delete=models.CASCADE)
    description = models.CharField(max_length=255)

    def __str__(self):
        return self.user.email

class Customer(models.Model):
    user = models.OneToOneField(CustomUser,on_delete=models.CASCADE)
    description = models.CharField(max_length=255)

    def __str__(self):
        return self.user.email
Additionally, once these codes are written, we must set the AUTH_USER_MODEL in settings.py.
twologin/settings.py
INSTALLED_APPS = [
...
]

...
AUTH_USER_MODEL = 'two_app.CustomUser'
...

SOCIALACCOUNT_PROVIDERS = {
    ...
}
6.Adding a new parameter for User type *This is the most crucial part
This is the most crucial point in this application. Allauth calls the state_from_request method at the point where the social account authentication process begins. We override this and use the attribute. Add the accompanying code.
The most important part of the previous code is:
request.session["user_type"] = get_request_param(request, "user", None)
The above code adds a new attribute called user_type, which assigns a value of either shop or customer at login. This attribute will assign the user who successfully logs in to either the shop model or the customer model.
Once you have created this model, run makemigrations, migrate, and createsuperuser.
two_app/models.py
...
import allauth
from allauth.socialaccount.models import SocialLogin
from allauth.account.utils import get_next_redirect_url
from allauth.utils import get_request_param

@classmethod
def state_from_request(cls, request):
    state = {}
    next_url = get_next_redirect_url(request)
    # # add this statement is important. We get the query parameter we added to the template and store it here as a  session value.
    try:
        request.session["user_type"] = get_request_param(request, "user", None)
    except KeyError:
        print('user_type not exist')

    if next_url:
        state["next"] = next_url
    state["process"] = get_request_param(request, "process", "login")
    state["scope"] = get_request_param(request, "scope", "")
    state["auth_params"] = get_request_param(request, "auth_params", "")

    return state

allauth.socialaccount.models.SocialLogin.state_from_request = state_from_request

class UserManager(BaseUserManager):
...
7. Creating an Admin
In this section, we will create an admin.
Admin is straightforward and simple. There's not much more to it than that.
two_app/admin.py
from django.contrib import admin
from .models import CustomUser, Shop, Customer

admin.site.register(CustomUser)
admin.site.register(Shop)
admin.site.register(Customer)
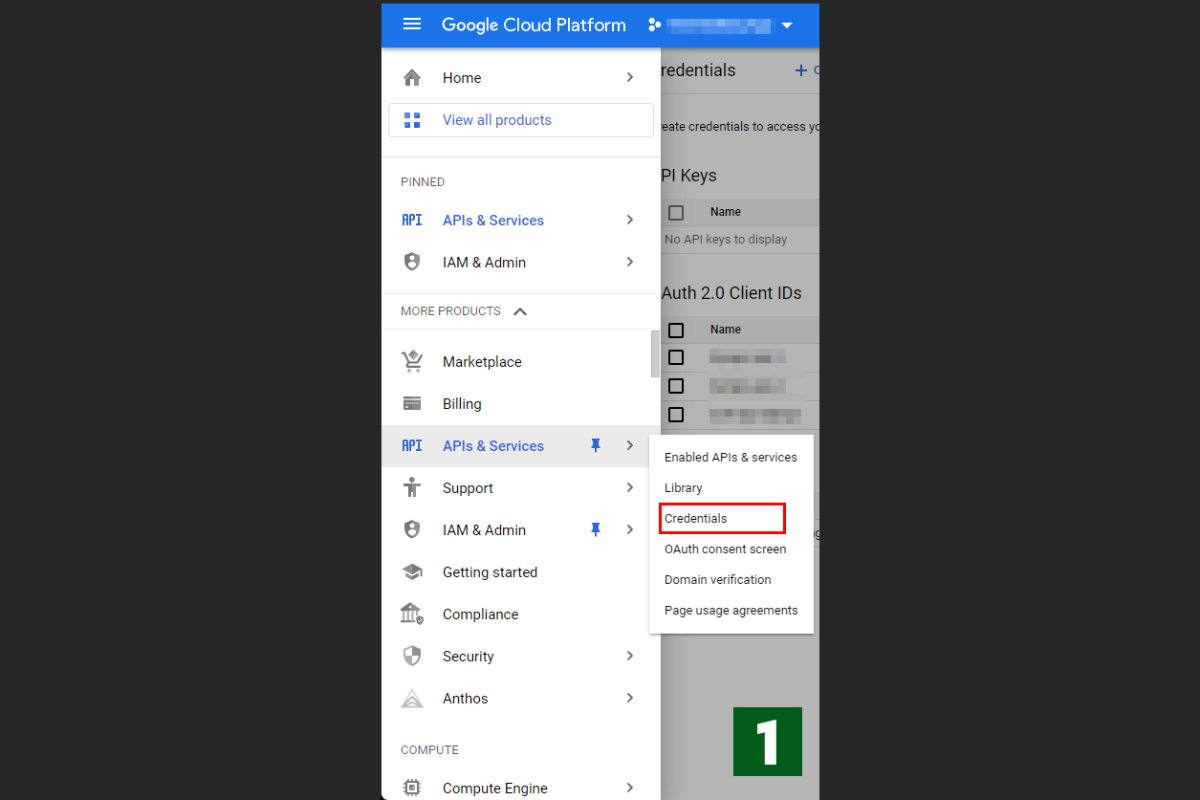
8. Creating an OAuth 2.0 Client ID in GCP
To create an OAuth 2.0 client ID in GCP (Google Cloud Platform), follow these steps:
- Access the GCP administrator screen and select "Credentials" from the API menu on the side.
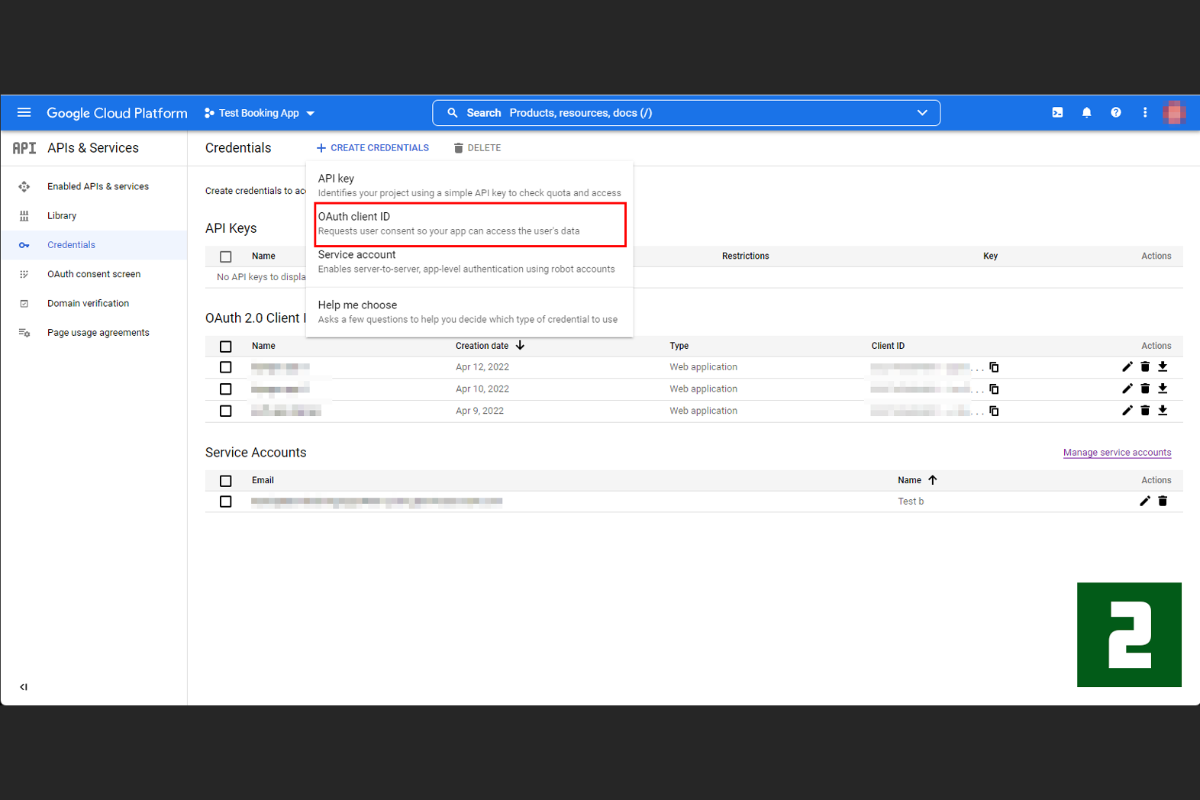
- On the next screen, select "CREATE CREDENTIALS" and choose "OAuth Client ID" from the drop-down menu.
- On the following screen, enter the configuration items as shown below:
- Select "Application type: Web application".
- Choose any name for "Name".
- For "Authorized Javascript origins", use
http://127.0.0.1:8000and also addhttp://localhost:8000just in case. The default port number is8000, but you can change it to another port number, such as8019. - For "Authorized redirect URIs", use the following URLs:
http://127.0.0.1:8000/accounts/google/login/callback/andhttp://localhost:8000/accounts/google/login/callback/. Note that the trailing slash is required. Make sure to include it, or you may encounter errors.
Once you have completed these steps, you will get a Client ID and Secret Key. You will use these in Django admin later.

9. Entering OAuth 2.0 Client ID and Key in Django Admin
After successfully creating an OAuth client ID, you will receive an ID and secret key. Let's enter these into Django Admin.
Navigate to the Django admin page and select SITE from the left menu. Then, in the SOCIAL ACCOUNTS section, select SOCIAL APPLICATION. Let's look at each item in detail.
9-1. SITES Configuration
To configure the SITES settings for allauth, access the administration screen. In chapter 3, we set SITE_ID=1 in settings.py for allauth. If SITE_ID=1, click on the word SITES in the right column, and enter 127.0.0.1:8000 for Domain name and Display name.
Note that if you create a new site by clicking the plus button for SITES in the right column here, the value of SITE_ID in settings.py will be 2.

9-2. Entering the SITE name and key
In this step, we will use the ID and secret key obtained from the OAuth 2.0 configuration screen in GCP.
- To configure Django admin, follow these steps:
- Provider: Select Google.
- Name: Enter any name you like.
- Client ID: Enter the Client ID obtained from the GCP administration page.
- Secret Key: Enter the key obtained from GCP admin, just like the Client ID.
- Key: Leave this field blank.
- Sites: You should be able to see the address of the site you're developing. Move it from Available sites to Chosen sites by clicking the arrow button.
With these steps, you have completed the configuration of Django admin. Let's move on to the next task.

10. Creating urls.py for the project side
Create a urls.py file at the root of the project. Then, add the allauth URL and the app URL to it.
from django.contrib import admin
from django.urls import path, include

urlpatterns = [
    path('admin/', admin.site.urls),
    path('', include('two_app.urls')),
    path('accounts/', include('allauth.urls')),
]
11. Creating the Template
Let's create a template.
Create a templates folder in the root of your project with the following structure:
The contents of the templates folder this time will look like the accompanying image.
It's important to note that this app template is divided into two folders: two_app and allauth. The two_app folder will contain our original, custom template files, while the socialaccount folder (which we will create) needs to contain copies of the templates used by allauth.
To begin, create a folder named socialaccount inside the allauth folder.
After creating the socialaccount folder, you'll need to locate the directory where external packages are stored. Look for the templates folder within the allauth package. Inside templates, locate the authentication_error.html and signup.html files. Copy these files and paste them into the socialaccount folder.
For reference, the contents of the allauth templates folder should look like this:
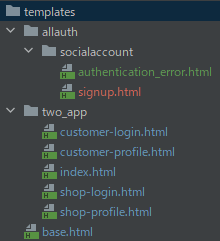
For reference, the contents of the allauth templates folder should look like this:
After this work is done, leave the allauth folder for the moment and create base.html and index.html.

11-1. Creating base.html and index.html
In this tutorial, we will use Bootstrap for frontend styling. To do so, please include the Bootstrap CDN URL in the head tag and just before the body tag of your template.
index.html contains links to the pages where the Shop and Customer login buttons are located. Additionally, there is a message display section at the top of the page that appears when logging out, among other things.
At the bottom of index.html, the user's email is displayed if they have already been authenticated.
templates/base.html
<!doctype html>
<html lang="en">
<head>
    <meta charset="UTF-8">
    <meta name="viewport"
          content="width=device-width, user-scalable=no, initial-scale=1.0, maximum-scale=1.0, minimum-scale=1.0">
    <meta http-equiv="X-UA-Compatible" content="ie=edge">
    <link href="https://cdn.jsdelivr.net/npm/[email protected]/dist/css/bootstrap.min.css" rel="stylesheet" integrity="sha384-+0n0xVW2eSR5OomGNYDnhzAbDsOXxcvSN1TPprVMTNDbiYZCxYbOOl7+AMvyTG2x" crossorigin="anonymous">
    <title>Auth App</title>
</head>
<body>

    {% block contents %}
    {% endblock %}

<script src="https://cdn.jsdelivr.net/npm/[email protected]/dist/js/bootstrap.bundle.min.js" integrity="sha384-ka7Sk0Gln4gmtz2MlQnikT1wXgYsOg+OMhuP+IlRH9sENBO0LRn5q+8nbTov4+1p" crossorigin="anonymous"></script>
</body>
</html>
templates/two_app/index.html
{% extends 'base.html' %}
{% block contents %}
    <div class="container text-dark mt-5">
        <div class="row justify-content-md-center">
            <h1>Create two entrances using Allauth and Google login Project</h1>
            <div>
                {% if messages %}
                    <div class="alert alert-primary" role="alert">
                    <strong>Messages:</strong>
                        {{ message }}
                        {% for message in messages %}
                            <li>{{message}}</li>
                        {% endfor %}
                    </div>
                {% endif %}
            </div>

            <div class="card" style="width: 18rem;">
                <a href="{% url 'two_app:shop-signup' %}">
                  <div class="card-body">
                        <h5 class="card-title">For Shop</h5>
                  </div>
                </a>
            </div>
            <div class="card" style="width: 18rem;">
                <a href="{% url 'two_app:customer-signUp' %}">
                  <div class="card-body">
                        <h5 class="card-title">For Customer</h5>
                  </div>
                </a>
            </div>
            {% if user.is_authenticated %}
                <p>Welcome, {{ user.email }}</p>
            {% else %}
                <p>Welcome Friend, please log in</p>
            {% endif %}
        </div>
    </div>
{% endblock %}
11-2. Creating a Page with the Google Login Button Displayed
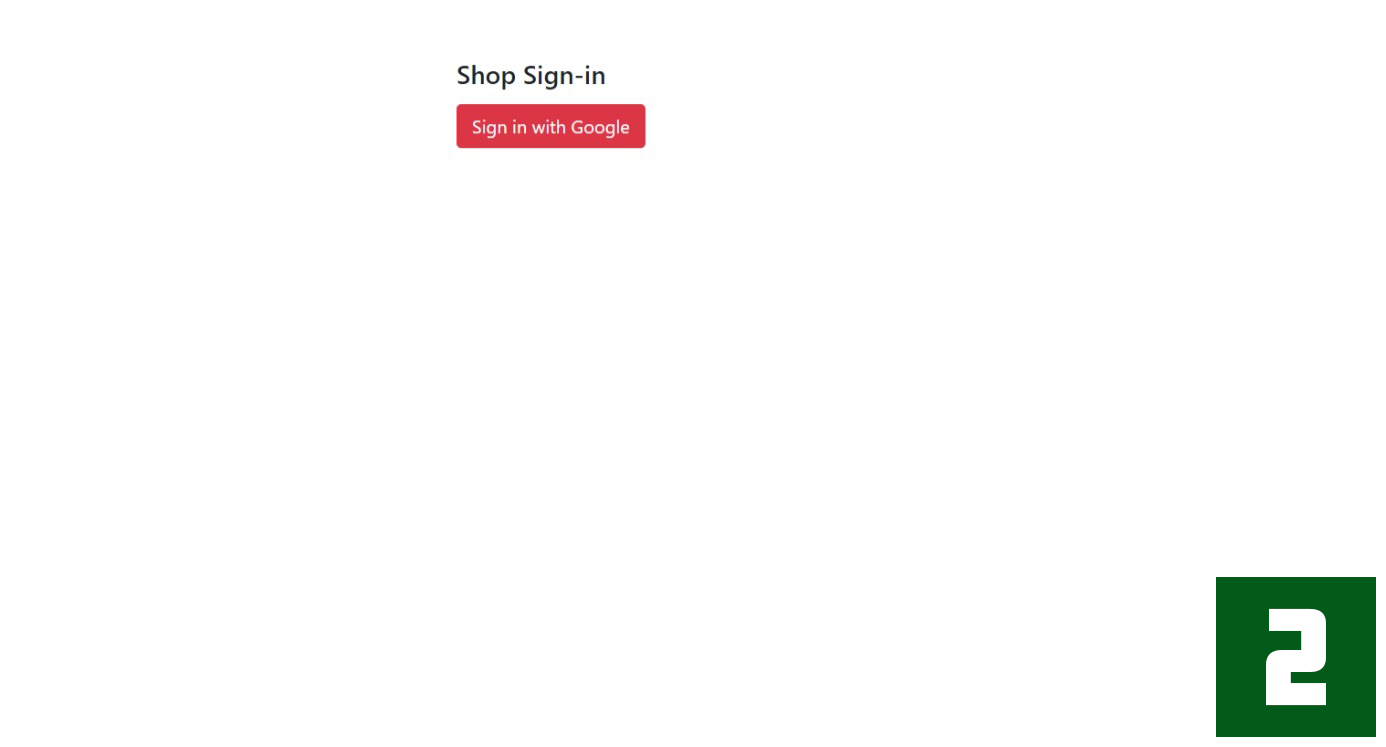
Let's create shop-login.html and customer-login.html.
In these templates, the important elements are the action="reauthenticate" attribute of the a tag and the user attribute.
Setting action="reauthenticate" ensures that even users who have logged in previously will be required to authenticate again.
Additionally, the user attribute with values of shop or customer set here will determine the user_type value in the state_from_request method we discussed earlier.
templates/two_app/shop-login.html
{% extends 'base.html' %}
{% load socialaccount %}
    {% block contents %}

    <div class="container text-dark mt-5">
        <div class="row justify-content-md-center">
          <div class="col-md-5 bg-grey p-3">
            <form class="form-signin">
                <h1 class="h3 mb-3">Please sign Shop</h1>
                <a href="{% provider_login_url 'google' action="reauthenticate" user="shop" %}" class="btn btn btn-danger btn-lg btn-block" role="button" aria-pressed="true">Sign in with Google</a>
              </form>
          </div>
        </div>
      </div>
        <div>{{ user_e }}</div>

   {% endblock %}
templates/two_app/customer-login.html
{% extends 'base.html' %}
{% load socialaccount %}

  {% block contents %}

    <div class="container text-dark mt-5">
        <div class="row justify-content-md-center">
          <div class="col-md-5 bg-grey p-3">
            <form class="form-signin">
                <h1 class="h3 mb-3">Please sign Customer</h1>
                <a href="{% provider_login_url 'google' action="reauthenticate" user="customer" %}" class="btn btn btn-danger btn-lg btn-block" role="button" aria-pressed="true">Sign in with Google</a>
              </form>
          </div>
        </div>
      </div>
        <div>{{ user_e }}</div>

{% endblock %}
11-3. Creating a profile page for each user type
Next, let's create the profile page to display after login.
This profile page is also divided into two: shop-profile.html and customer-profile.html.
These profile pages only display the user's name, email address, and a basic text message.
templates/two_app/shop-profile.html
{% extends 'base.html' %}
{% block contents %}
    {% if messages %}
    <div>
      <strong>Messages:</strong>
      <ul>
        {% for message in messages %}
        <li>{{message}}</li>
        {% endfor %}
      </ul>
    </div>
    {% endif %}

    {% if user.is_authenticated %}
        <p>Welcome, {{ user.email }}</p>
        <p>{{ text }}</p>
    {% else %}
        <p>Welcome Friend, please log in</p>
    {% endif %}

    {% if user.is_authenticated %}
        <a href="javascript:{document.getElementById('logout').submit()}">Logout</a>
        <form action="{% url 'two_app:account_logout' %}" id="logout" method="POST">
            {% csrf_token %}
            <input type="hidden">
        </form>
    {% else %}
        <h2>Not login</h2>
    {% endif %}
{% endblock %}
templates/two_app/customer-profile.html
{% extends 'base.html' %}
{% block contents %}
    {% if messages %}
    <div>
      <strong>Messages:</strong>
      <ul>
        {% for message in messages %}
        <li>{{message}}</li>
        {% endfor %}
      </ul>
    </div>
    {% endif %}

    {% if user.is_authenticated %}
        <p>Welcome, {{ user.email }}</p>
    {% else %}
        <p>Welcome Friend, please log in</p>
    {% endif %}

  {% if user.is_authenticated %}
        <a href="javascript:{document.getElementById('logout').submit()}">Logout</a>
        <form action="{% url 'two_app:account_logout' %}" id="logout" method="POST">
            {% csrf_token %}
            <input type="hidden">
        </form>
    {% else %}
        <h2>Not login</h2>
    {% endif %}
{% endblock %}
11-4. template authentication_error.html and signup.html copied from allauth
The authentication_error.html and signup.html are copied and placed from the allauth template, I'll post the code here in case you need it.
In fact, this app works even if you don't copy these files.
The reason is that if allauth does not explicitly have a file in the templates folder, it will look for the file in the external package's template folder.
However, since we plan to make significant changes to templates in the future, I have intentionally placed them in this folder because we think it will be easier to understand if I am explicitly written.
templates/allauth/socialaccount/authentication_error.html
{% extends "socialaccount/base.html" %}

{% load i18n %}

{% block head_title %}{% trans "Social Network Login Failure" %}{% endblock %}

{% block content %}
<h1>{% trans "Social Network Login Failure" %}</h1>

<p>{% trans "An error occurred while attempting to login via your social network account." %}</p>
{% endblock %}
templates/allauth/socialaccount/signup.html
{% extends "socialaccount/base.html" %}
{% load i18n %}
{% block head_title %}{% trans "Signup" %}{% endblock %}
{% block content %}
<h1>{% trans "Sign Up" %}</h1>
<p>{% blocktrans with provider_name=account.get_provider.name site_name=site.name %}You are about to use your {{provider_name}} account to login to
{{site_name}}. As a final step, please complete the following form:{% endblocktrans %}</p>
<form class="signup" id="signup_form" method="post" action="{% url 'socialaccount_signup' %}">
{% csrf_token %}
{{ form.as_p }}
{% if redirect_field_value %}
<input type="hidden" name="{{ redirect_field_name }}" value="{{ redirect_field_value }}" />
{% endif %}
<button type="submit">{% trans "Sign Up" %} »</button>
</form>
{% endblock %}
12. Creating Views
Now, let's create some views.
The views to create are HomeView, ShopLoginview, CustomerLoginview, ShopProfileview, and CustomerProfileview.
HomeView, ShopLoginview, and CustomerLoginvieware views corresponding to the login pages.
ShopProfileview and CustomerProfilevieware views corresponding to the profile pages.
two_app/views.py
from allauth.account.views import LoginView
from django.contrib.auth.decorators import login_required
from django.shortcuts import render

from two_app.models import CustomUser, Shop, Customer

class HomeView(LoginView):
    template_name = "two_app/index.html"

class ShopLoginView(LoginView):
    template_name = 'two_app/shop-login.html'

class CustomerLoginView(LoginView):
    template_name = 'two_app/customer-login.html'

@login_required
def shopProfileView(request, username):
    user = CustomUser.objects.get(username=username)

    if Shop.objects.filter(user__username=username).exists():
        text = Shop.objects.filter(user__username=username).values_list('description', flat=True).get()
    else:
        text = Shop.objects.create(user=user, description="First Comment")
        text = text.description
    context = {
        'user': user,
        'text': text
    }
    template = "two_app/shop-profile.html"
    return render(request, template, context)

@login_required
def customerProfileView(request, username):
    user = CustomUser.objects.get(username=username)

    if Customer.objects.filter(user__username=username).exists():
        text = Customer.objects.filter(user__username=username).values_list('description', flat=True).get()
    else:
        text = Customer.objects.create(user=user, description="First Comment")
        text = text.description

    context = {
        'user': user,
        'text': text
    }
    template = "two_app/customer-profile.html"
    return render(request, template, context)
13. Creating an Adapter for registration and login
This chapter is important, as is the state_from_request method in Chapter 7. As mentioned earlier, this app's authentication system adds an attribute to the session to allocate users to each user who logs in from the shop and customer templates.
The adapter we create in this chapter provides the functionality for sorting users based on the session. If you want to learn more about the details of the adapter, please refer to the allauth document, which provides a detailed description.
In this app, we create three different adapters.
Create adapter.py in the app folder and write the code as follows.
twoapp/adapter.py
from allauth.account.adapter import DefaultAccountAdapter
from two_app.models import CustomUser
from django.http import HttpResponse

class AccountAdapter(DefaultAccountAdapter):

    def get_signup_redirect_url(self, request):

        if request.session["user_type"] == "shop":
            shop_user = CustomUser.objects.get(email=self.request.user)
            shop_user.is_shop = True
            shop_user.save()
            path = '/accounts/shop/{username}/'
            return path.format(username=request.user.username)

        elif request.session["user_type"] == "customer":
            customer_user = CustomUser.objects.get(email=self.request.user)
            customer_user.is_customer = True
            customer_user.save()
            path = '/accounts/customer/{username}/'
            return path.format(username=request.user.username)

        else:
            user = CustomUser.objects.get(email=self.request.user)
            user.delete()
            return HttpResponse("This is an error related to session. The registered USER deleted.")

    def get_login_redirect_url(self, request):

        if request.session["user_type"] == "shop":
            path = '/accounts/shop/{username}/'
            return path.format(username=request.user.username)

        elif request.session["user_type"] == "customer":
            path = '/accounts/customer/{username}/'
            return path.format(username=request.user.username)

        else:
            return HttpResponse('This is an error related to session.')
Let me explain about the adapter mentioned above.
The get_signup_redirect_url method is the method that users go through during their initial authentication.
When a user logs in from the shop side login page, the is_shop field is set to true.
Similarly, when a user logs in from the customer side login page, the is_customer field is set to true.
Then, a path to redirect the user is specified based on the session value.
Also, if neither shop nor customer value is included in the user's session, the user cannot be sorted and is therefore deleted.
The get_login_redirect_url method is the method that users go through during their second authentication.
Similar to the get_signup_redirect_url method, a path to redirect the user is specified based on the session value.
After finishing writing this code, you need to add code related to the adapter in settings.py.
Add the following code:
twologin/settings.py
INSTALLED_APPS = [
...
]

...
ACCOUNT_ADAPTER = 'two_app.adapter.AccountAdapter'
...

SOCIALACCOUNT_PROVIDERS = {
    ...
}
14. Creating urls.py on the Application Side
Next, create urls.py on the application side corresponding to each view.
two_app/urls.py
from allauth.account.views import LogoutView
from django.urls import path
from . import views
from .views import HomeView

app_name = 'two_app'

urlpatterns = [
    path('', HomeView.as_view(), name='home'),
    path('accounts/login/', views.ShopLogin.as_view(), name='shop-signup'),
    path('accounts/login-customer/', views.CustomerLogin.as_view(), name='customer-signUp'),
    path('accounts/shop/<str:username>/', views.shopProfile, name='shop-profile'),
    path('accounts/customer/<str:username>/', views.customerProfile, name='customer-profile'),
    path('accounts/account_logout/', LogoutView.as_view(), name='account_logout'),
]
Now, let's see how it works. If it works correctly, the screen transition should look like this!
Some of the port numbers in the capture may be different, but there's no need to worry about it. Also, to be honest, the design is not great, but it will be improved in the next article.


15. Creating a Logout Function
We will create a logout function. However, since the default logout function of allauth is sufficient, no special work is needed for the logout function. The following code is already included in shop-profile.html and customer-profile.html.
two_app/shop-profile.html, two_app/customer-profile.html
{% if user.is_authenticated %}
        <a href="javascript:{document.getElementById('logout').submit()}">Logout</a>
        <form action="{% url 'two_app:account_logout' %}" id="logout" method="POST">
            {% csrf_token %}
            <input type="hidden">
        </form>
    {% else %}
        <h2>Not login</h2>
    {% endif %}
Additionally, please confirm that the following code exists in urls.py.
urls.py
urlpatterns = [
    ...
    path('accounts/account_logout/', LogoutView.as_view(), name='account_logout'),
]
Finally, add the accompanying code to settings.py. This specifies the logout redirect destination in settings.py.
twologin/settings.py
ACCOUNT_LOGOUT_REDIRECT_URL = 'two_app:home'
16. Avoiding Duplicate Users for the Shop and Customer Models
As mentioned at the beginning of this technical blog post, CustomUser is the base user model for this application.
All users are registered as a CustomUser, but they are also designed to be registered as either a Shop or a Customer.
To avoid increased application complexity and unexpected behavior, users registered as a Shop should not be able to register as a Customer, and vice versa.
To achieve this, when a user registers as either a Shop or a Customer, we need to check if they are already registered with the other model. Furthermore, if they attempt to log in under these circumstances, we need a mechanism to warn them and prevent the login.
One way to implement this is by overriding the pre_social_login method of the allauth adapter. pre_social_login is a method that is hooked right before a social account user logs in.
Let's implement this. Add the following code to adapter.py:
two_app/adapter.py
...
from two_app.models import CustomUser, Customer, Shop
from allauth.exceptions import ImmediateHttpResponse
from allauth.socialaccount.adapter import DefaultSocialAccountAdapter
class SocialAccountAdapter(DefaultSocialAccountAdapter):
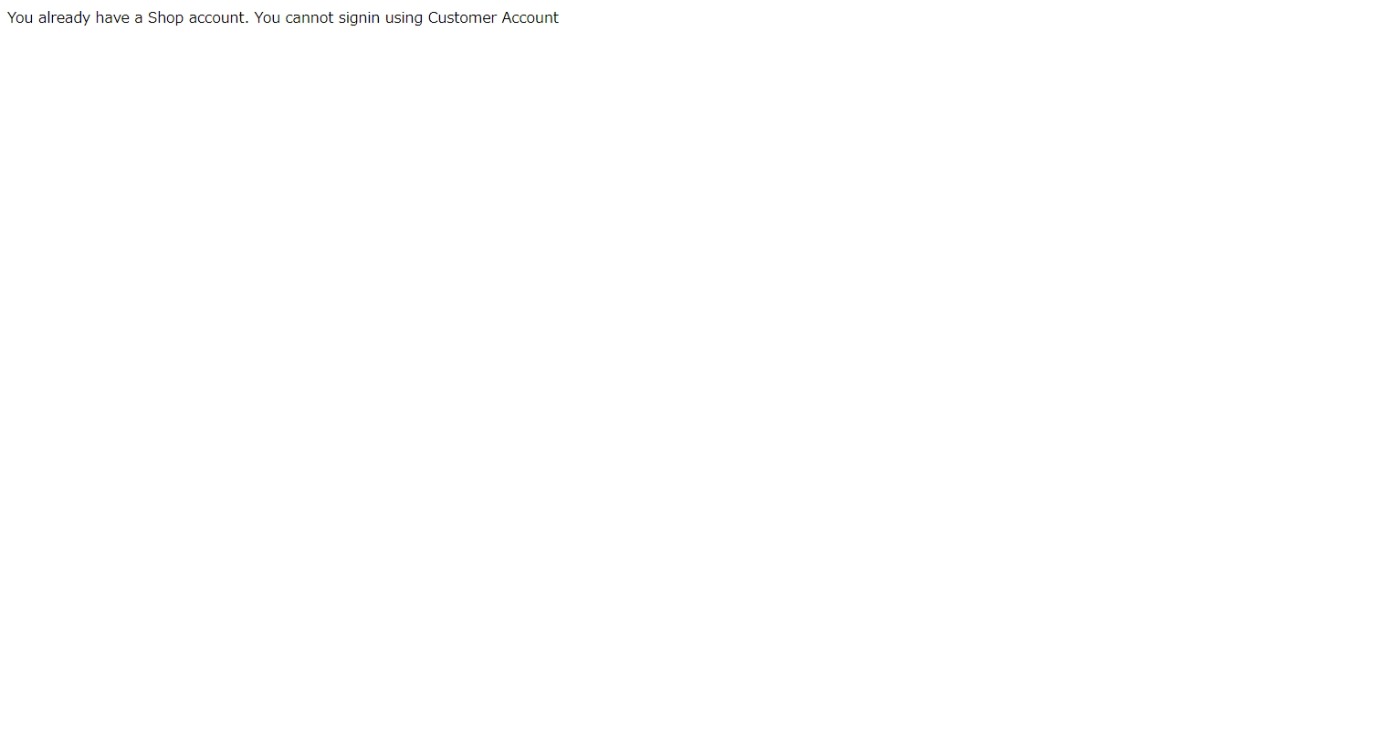
def pre_social_login(self, request, sociallogin):
user = sociallogin.user
if request.session["user_type"] == "shop":
if Customer.objects.filter(user__email=user).exists():
raise ImmediateHttpResponse(HttpResponse('You already have a Customer account. You cannot signin using Shop Account'))
pass
if request.session["user_type"] == "customer":
if Shop.objects.filter(user__email=user).exists():
raise ImmediateHttpResponse(HttpResponse('You already have a Shop account. You cannot signin using Customer Account'))
pass
pass
class AccountAdapter(DefaultAccountAdapter):
...
To register the adapter in settings.py, add the accompanying code:
twologin/settings.py
SOCIALACCOUNT_ADAPTER = 'two_app.adapter.SocialAccountAdapter'
If the code is written correctly, the result will be as follows:
However, even if the application appears to be working properly at this point, it is not. For instance, if a user whose profile is correctly displayed in accounts/shop/aaa, accesses accounts/customer/aaa, the profile will be displayed. This is not the expected behavior, so we need to ensure that users cannot access any other page.
The repository for this authentication application we have implemented can be found here.
To address this issue more fully, I've written a Part 2 to this article. This tutorial is getting a bit long, so we'll end it here. Thanks for following along!